Yuki's Flying Card Models
http://www2u.biglobe.ne.jp/~poseidon/
Instruction - Saab J35F "Draken"-
STEP 1: Fuselage
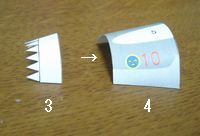 Cut out part #3 and #4. Curl the parts and run a line of glue along the tab (not trianguler shaped tabs) on the back of part #3. Glue part #4 over part #3.
 Form the part #4 (with the part #3) into a tube and glue together with a line of glue along the tab.
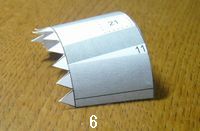 Cut out part #6 and form the part into a tube and glue together with a line of glue along the tab.
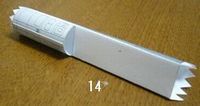
 Cut out part #14 and rotate it as shown with the printed side down. Form the part into a tube that half of it is flat on the bottom.
 Glue together with a line of glue along the tab.
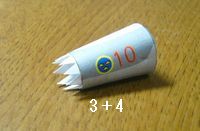
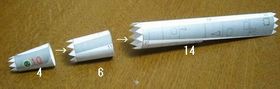 Run a line of glue along the tirangular shaped tabs on the front of part #6 and glue part #4 over them. Attach part #14 to the back of the part #6 with a line of glue along with triangular shaped tabs.
STEP 2: Double Delta Wing
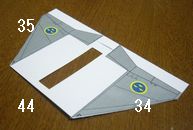 Cut out part #44, #33 and #34 and rotate them as shown with the printed side down. Run a line of glue around the part #33 and #34 and fold it up onto the upper half. Cut out center panel indicated on the printouts of part #44 to reduce the weight.
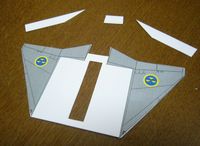 Cut out white area as shown in the right picture.
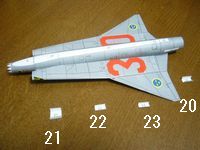
 Glue the wing to the fuselage on the area indicated on the printouts.
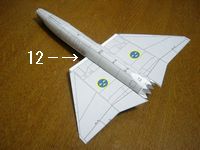 Cut out part #12. Curl the part and fold the tabs on the ends of the side panel down flat. Glue the part to the fuselage on the area indicated on the printouts.
 Cut out part #15. Form the part into a tube and glue together with a line of glue along the tab.
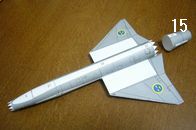 Attach part #15 to the back of the fuselage with a line of glue along with triangular shaped tabs.
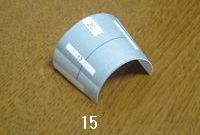
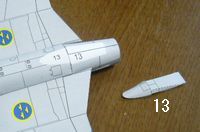 Cut out part #13. Form the part as shown in the right picture. Glue the part to the lower side of the fuselage on the area indicated on the printouts.
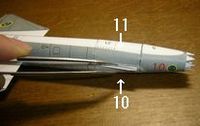 Cut out part #10 and #11 and fold them down. Glue the parts to the both side of the fuselage on the area indicated on the printouts.
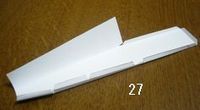 Cut out part #27 and score dashed line. Fold tabs along the scored dashed lines as shown in the right picture. Air-intake should be rolled (not folded). Glue together with a line of glue along the tab. Part #26 should be the same.
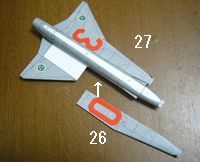 Attach part #26 and #27 to the fuselage.
STEP 3: Tail, Canopy and Miscellaneous Parts
 Cut out part #20, #22, #23 and #24. Fold them and glue the parts to the fuselage on the area indicated on the printouts.
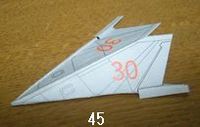 Cut out part #45 and rotate it as shown with the printed side down. Run a line of glue around one half and flod it down onto the other half. Be sure not to get any glue on the tabs attached to the two halves.
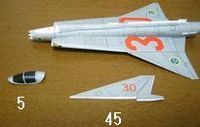 Glue the part #5 (canopy) to the fuselage in the area indicated on the printouts. Glue the part #45 (tail) to the fuselage in the area indicated on the printouts.
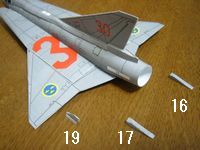 Glue the part #16, #17 and #19 to the fuselage in the area indicated on the printouts.
STEP 4: Nose
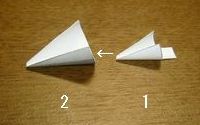 Cut out part #1 and #2. Form the part into a cone. Run a line of glue along with a half of part #2 and glue it to the part #1.
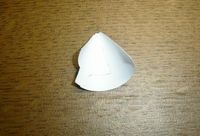 When glue is thoroughly dry, glue together with a line of glue along the tab to form a cone.
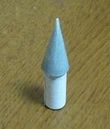
 Cut out part #24 and #25 (the weight). Fold and roll #11 into a tight roll and glue it inside the nose.
 Attach the nose to the fuselage with a line of glue along the triangular shaped tabs.
STEP 5: Landing Gear like Display Stand
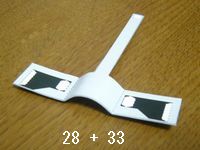 Cut out part #28 and #33. Rotate the part #28 as shown with the printed side down and coat the no-printed surface with the glue. Place the part #28 on the part #33 to glue and smooth out glue. When glue is thoroughly dry, score the dashed line and fold and curl the part along the scored dashed line as shown in the right picture.
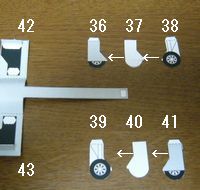 Cut out part #42 and #43. Attach the parts on the area indicated on the printouts. Cut out part #36, #37 and #38. Coat both side of the part #37 with glue and attach the part #36 and #38 to the #37. Part #39, #40 and #41 should be the same. Attach the landing gears on the area indicated on the printouts.
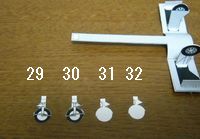 Cut out part #29, #30, #31 and #32 and glue together. Attache the nose landing gear on the area indicated on the printouts.
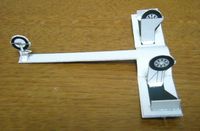 The display stand is complete. Put your Draken on this display stand (Do not glue).
PR: Äqŗ¤Åµé╣Ä®ō]ÄįWeb-ē┐ŖiéŌŗ@ö\é┼öõŖr- |
ōdō«āAāVāXāgÄ®ō]ÄįWeb-ē┐ŖiéŌŗ@ö\é┼öõŖr- |
Ä®ō]ÄįĢ█ī» |
É▄éĶéĮéĮé▌Ä®ō]ÄįüĢāXāéü[āŗāoāCāNWeb-ē┐ŖiéŌŗ@ö\é┼öõŖr- |
ōVæ╠¢]ēōŗŠWeb-ōVæ╠¢]ēōŗŠé╠æIéčĢ¹ |
MTB ā}āEāōāeāōāoāCāNöõŖrWeb